
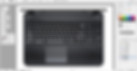
Laptop
Breakdown
The following design samples were used for internal company designs, commercial art and conceptual design use.
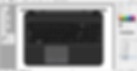
Laptop starting with shapes
Create my basic shapes and base colors

I use the rectangle tool to create most of the shapes I needed. Next I round the corners of the rectangles and squares. Some of the sames I cut using the pathfinder tool (buttons on touchpad). Finally decided on what colors I like. I tried to chose something that would have contrast against white highlights.
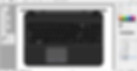
Putting in text, icons, and gradients
I used a my personal laptop as a keyboard reference. I used the text tool to create the type. I used the arrow option in the stroke tab. Lastly, created the windows icon with the rectangle tool and pathfinder tool.
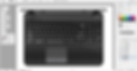
Dropping in texture
Inking finalize drawing in illustrator

I create a pattern of circles in the shape of a square and group it. Next, I dragged the group to the synbols window and made it a pattern. Select the the base color of the laptop and fill it with the pattern. At the end I change the blending mode to multiply.
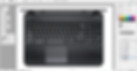
Adding (AO) Ambient Occlusion
I Copied all shapes from the color and buttons color layer. Next paste in place on the ao layer. Turn all shapes on the ao layer white. Add a inner glow, using black as your color. Last, change the blending mode to multipy.
Putting in the cast shadows

I used the pen tool to draw in my shadows. Fill all shapes with black and turned the blending mode to multiply.
Adding reflections and reflective light.

I used the pen tool to draw in my reflections and reflective light. Fill all shapes with white and turn the blending mode to screen.
Adding highlights.
I used the pen tool to draw in my highlights. Fill all shapes with white and turn the blending mode to overlay.
Color Overlay.

I used the pen tool to draw in my highlights. Fill all shapes with blue and turn the blending mode to overlay.
Put in specular highlights.

I used the pen tool to draw in my specular highlights. Fill all shapes with white and turn the blending mode to screen. I changed the opacity until I was satisfied with the results.
Adding spotlight effect.
I used the gradient tool with the type on radial. Fill the gradient with white to black and turn the blending mode to screen. I changed the opacity until I was satisfied with the results.
Add floor shadow to the base of the laptop.
I copied the base of the laptop from the color layer, fill it black and add a blur affect. Lastly I turn the blending mode to multiply. Adjusted the opacity until I was satisfied with the look.